

A towel warmer sounds like a simple upgrade — until you realize how many people install the wrong type in the wrong place and end up disappointed. Plug-in, hardwired, and hydronic options all install differently and work best in specific locations.
The insights here come from firsthand installation of a plug-in towel warmer and observing a professional hydronic installation in a residential bathroom. Both worked well because the unit matched the space, the available power or plumbing, and how the bathroom was actually used — not just how it looked on paper.
Below, this guide breaks down the main towel warmer types, the best locations for each, and what installation really involves, so you can make a smart choice without turning a simple comfort upgrade into an unnecessary project.
Choosing the Right Towel Warmer (What I Recommend)
I’ll be real with you — a towel warmer isn’t just about luxury. Sure, stepping out of the shower and wrapping yourself in a warm towel feels amazing, but it also helps keep your bathroom dry and mildew-free. Now, I’ve looked into both electric and hydronic models, and here’s my straight-up opinion on who should go for what.
Electric Towel Warmers — Plug-in vs. Hardwired
- Plug-in models If you’re like me and don’t want to mess with wiring inside the wall, go plug-in. You just mount it, plug it into a GFCI outlet, and you’re done. I’d recommend this if you’re renting, or if you want something quick and flexible without calling an electrician.
- Hardwired models Now, if you’re remodeling your bathroom or building new, I’d say go hardwired. It looks cleaner (no cord hanging down), and it feels more permanent. But here’s the catch: you’ll probably need an electrician to do it right. If you’re not comfortable with wiring, don’t risk it — safety first.
If you’re leaning toward a wall-mounted electric model, I’ve reviewed several popular options in detail, including real-world performance, heat output, and build quality. You can see my full breakdown here:
Hydronic Towel Warmers
Hydronic warmers are a different beast. They hook into your home’s hot water heating system. Honestly, I’d only recommend these if your house already runs on radiant heating. They’re efficient and double as a radiator, but the installation is plumbing-heavy. Unless you’re handy with copper pipes and torches, I’d call a pro for this one.
Small Bathroom? Here’s What Works Best
I’ve seen people try to squeeze big units into tiny bathrooms, and it just doesn’t work. If your bathroom is small:
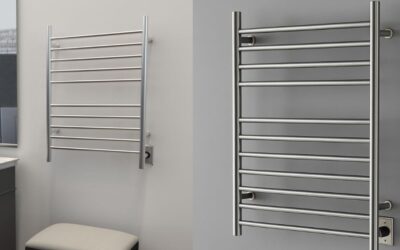
- Wall-mounted electric: Best choice. Saves space, looks neat.
- Bucket-style: Great if you’re in an apartment or don’t want to drill into walls. Just plug it in and drop your towels inside.
- Hydronic: Honestly, skip it for small spaces. Too much hassle, and it eats up room.
My Advice on Who Should Choose What
- If you want easy DIY → Go plug-in electric.
- If you’re doing a remodel → Hardwired electric is worth it.
- If your home already has radiant heating → Hydronic makes sense.
- If you’ve got a tiny bathroom → Wall-mounted or bucket-style electric is your friend.
Best Location for Each Type of Towel Warmer
Choosing the right spot is just as important as choosing the right unit.
Choosing the right location improves heating efficiency, safety, and everyday convenience. Matching the warmer type to your bathroom layout ensures the best long-term experience.
Cost and Time
Installation costs vary by bathroom layout, wall access, and local labor rates. Planning ahead can significantly reduce total installation time and expense.
Tools and Materials (By Installation Type)
Electric Plug-In or Hardwired
-
Drill/driver
-
Level
-
Tape measure
-
Screwdriver
-
Wall anchors or toggle bolts
-
GFCI outlet (plug-in) or dedicated circuit (hardwired)
Hydronic
-
Adjustable wrench
-
Copper pipe and fittings
-
Chrome nipples with shut-off valves
-
Propane torch and flame shield
-
Reciprocating saw
-
Safety gloves and eye protection
Always check the manufacturer’s instructions for your specific model
Step‑by‑Step Installation Guide
1. Site Assessment
Begin by selecting a location away from direct water spray. Ensure that the spot provides access to the required utility — either an electrical outlet for electric models or plumbing connections for hydronic models. Use the manufacturer’s template to mark the mounting points. Tape the template to the wall, check alignment with a level, and mark the drill points accurately.
2. Mounting the Frame
- When drilling into solid blocking or studs, use standard wood screws.
- For hollow drywall sections, use heavy‑duty anchors such as toggle bolts to support the load.
Once the holes are drilled, secure the permanent mounting brackets tightly to the wall. Place the towel warmer body onto the brackets. Many units use a set‑screw or snap‑fit system to lock the warmer onto the wall plates. Confirm that the unit is stable and plumb before proceeding to utility connections.
3. Utility Hookup
Electrical (Plug‑in and Hardwired)
Plug‑in models
Mount the warmer and plug it into a nearby GFCI outlet.
Hardwired models:
-
- Turn off power at the main breaker panel.
- Inside the wall box, connect the three wires: black (hot), white (neutral), and green/bare copper (ground).
- Secure connections with wire nuts, ensuring a firm mechanical twist before applying the nut.
- Connect the ground wire both to the warmer’s ground wire and to the metal electrical box if applicable.
- Tuck the wires neatly into the box and secure the cover plate.
- Perform a continuity or voltage check before sealing the unit permanently.
- Restore power and confirm that the warmer heats correctly.
If you are uncertain about handling live wires or circuit loading, consult a licensed electrician to ensure compliance with local codes.
Hydronic Models
- Drain the hot water heating system before beginning.
- Cut and reroute copper pipes to align with the warmer’s inlet and outlet.
- Dry‑fit the pipes and fittings, then solder them with a propane torch. Always use a flame‑retardant shield to protect surrounding materials.
- Install chrome nipples with shut‑off valves for clean connections.
- Refill the system, bleed air through the radiator valve, and check all joints for leaks.
4. Final Testing
- Electric units: Flip the breaker and confirm that the rails heat evenly.
- Hydronic units: Slowly restore water pressure, bleed trapped air, and inspect connections for leaks.
Safety Stuff not to Skip
- Turn off power for electric installs; turn off water and drain the system for hydronic.
- Always use a GFCI-protected circuit in bathrooms. I wouldn’t plug a warmer into a non-GFCI outlet.
- Wear eye protection and gloves when soldering or drilling.
- Make sure the wall studs or blocking can support the unit — these things can be heavier than they look.
Maintenance Tips I Use
- Wipe it down regularly and dust between rails.
- If hydronic, bleed the unit once a year to avoid cold spots — I do this every fall.
- Check fittings and wiring occasionally for leaks or looseness.
Frequently Asked Questions
Do towel warmers use a lot of electricity?
No. Most electric towel warmers use about the same power as a standard light bulb. When used with a timer, the operating cost is minimal.
Is a towel warmer safe to use in a bathroom?
Yes, when installed correctly. Electric models should always be connected to a GFCI-protected circuit, and hydronic units must be properly plumbed and pressure-tested.
Can I install a towel warmer myself?
Plug-in electric models are generally DIY-friendly. Hardwired and hydronic installations are best handled by licensed professionals unless you have experience with electrical or plumbing work.
Do towel warmers actually heat the bathroom?
Hydronic and larger electric models can add noticeable warmth, but towel warmers are designed primarily for drying towels — not replacing a main heat source.
Where should I NOT install a towel warmer?
Avoid direct water spray zones, areas where cords must cross walkways, or locations without proper electrical or plumbing access.

Written by Fatzuh
Related Articles

Live Fine Bucket Towel Warmer Review: Bathroom Luxury Made Simple
I’ve always believed that finishing a shower or bath with a warm towel makes a small but meaningful difference in comfort. There’s something about stepping out of the bathroom and wrapping yourself in a toasty towel that feels like a tiny home spa experience. That’s...
Amba RWH-SB Radiant Towel Warmer – Hands-on Review
Looking for a towel warmer that blends sleek design with everyday practicality? The Amba RWH‑SB Radiant delivers even heating across 10 stainless steel bars, warming two towels in minutes. With dual installation options (hardwired or plug‑in), multiple finishes from brushed steel to polished gold, and energy‑efficient performance, it’s a versatile upgrade for modern bathrooms. But is its moderate warmth and shorter warranty enough to justify the price? Read our full hands‑on review to see how it stacks up against competitors.

Best Towel Warmers
Best Towel Warmers 2026 — Top Picks and Complete Buyer’s GuideWe have evaluated the best towel warmers to help you find the right one for your home bathroom, including wall-mounted, freestanding, and bucket-style models, so you can easily pick the perfect fit for your...

Relieving Eye Discomfort: How Warm Compresses and Towel Warmers Can Help
Eye discomfort is common and can be caused by things like tiredness, digital eye strain, allergies, or minor issues such as eye twitching. You might notice irritation, dryness, twitching, or a heavy feeling around your eyes. While these symptoms are usually harmless,...